ServiceM8 Integration
This guide walks an admin through connecting Brix to ServiceM8, choosing which data to sync, mapping users, and running an initial client sync. Once connected, day-to-day syncing happens automatically or from the Transfers page.
Before you begin
Section titled “Before you begin”You will need:
- Admin access to Brix (so the Manage area is visible).
- An active ServiceM8 account with permission to authorise third-party apps.
- The ServiceM8 login credentials of the user who will authorise the connection — you sign in to ServiceM8 directly, no separate key is required.
- A clear idea of which data you want to flow between Brix and ServiceM8 (clients, notes, photos, quotes — in either direction). You can change this later.
Step 1 — Open the Integrations page
Section titled “Step 1 — Open the Integrations page”- Sign in to Brix as an admin.
- From the top bar or sidebar open Manage.
- Choose Settings → Integrations.
The Integrations page shows Available and Connected tabs at the top, each with a count, and a search box below them. Each integration appears as a card with its logo, a short description, and a Connect or Configure button. ServiceM8 appears on the Available tab — and also on Connected once it is connected for your workspace.
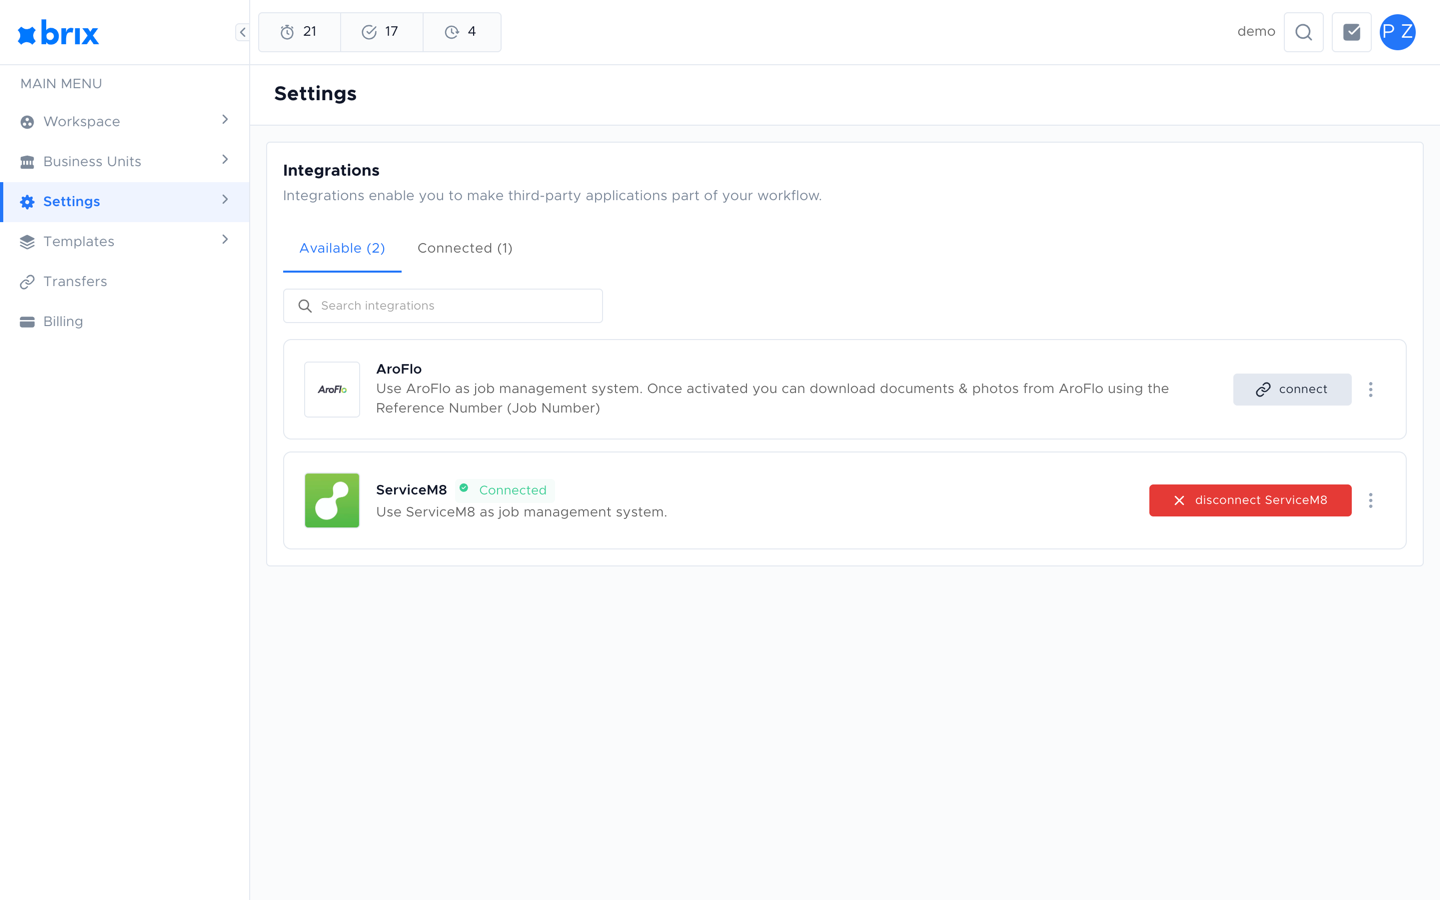
Step 2 — Open the ServiceM8 integration
Section titled “Step 2 — Open the ServiceM8 integration”Click Configure (or Connect if it is not yet connected) on the ServiceM8 card. The ServiceM8 integration page opens.
If your workspace has not yet connected ServiceM8 you will see:
- A short description and the ServiceM8 logo.
- An Enable Integration toggle.
- A Features section with one switch per data flow.
- A Connect with ServiceM8 button.
If ServiceM8 is already connected, skip to Step 6 — Manage the connection. The connected page looks like this:
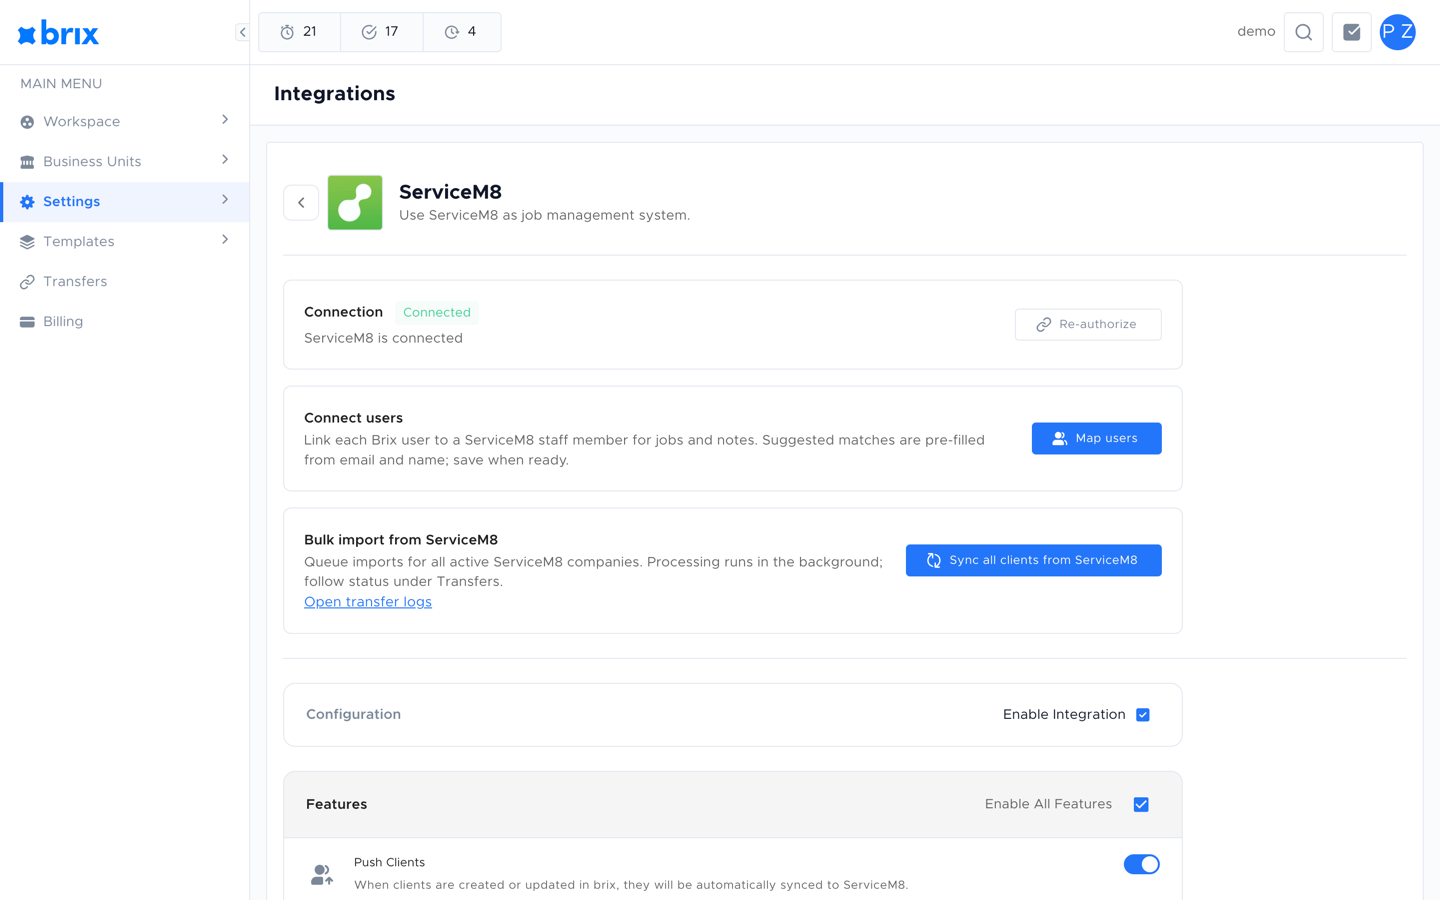
Step 3 — Choose which features to enable
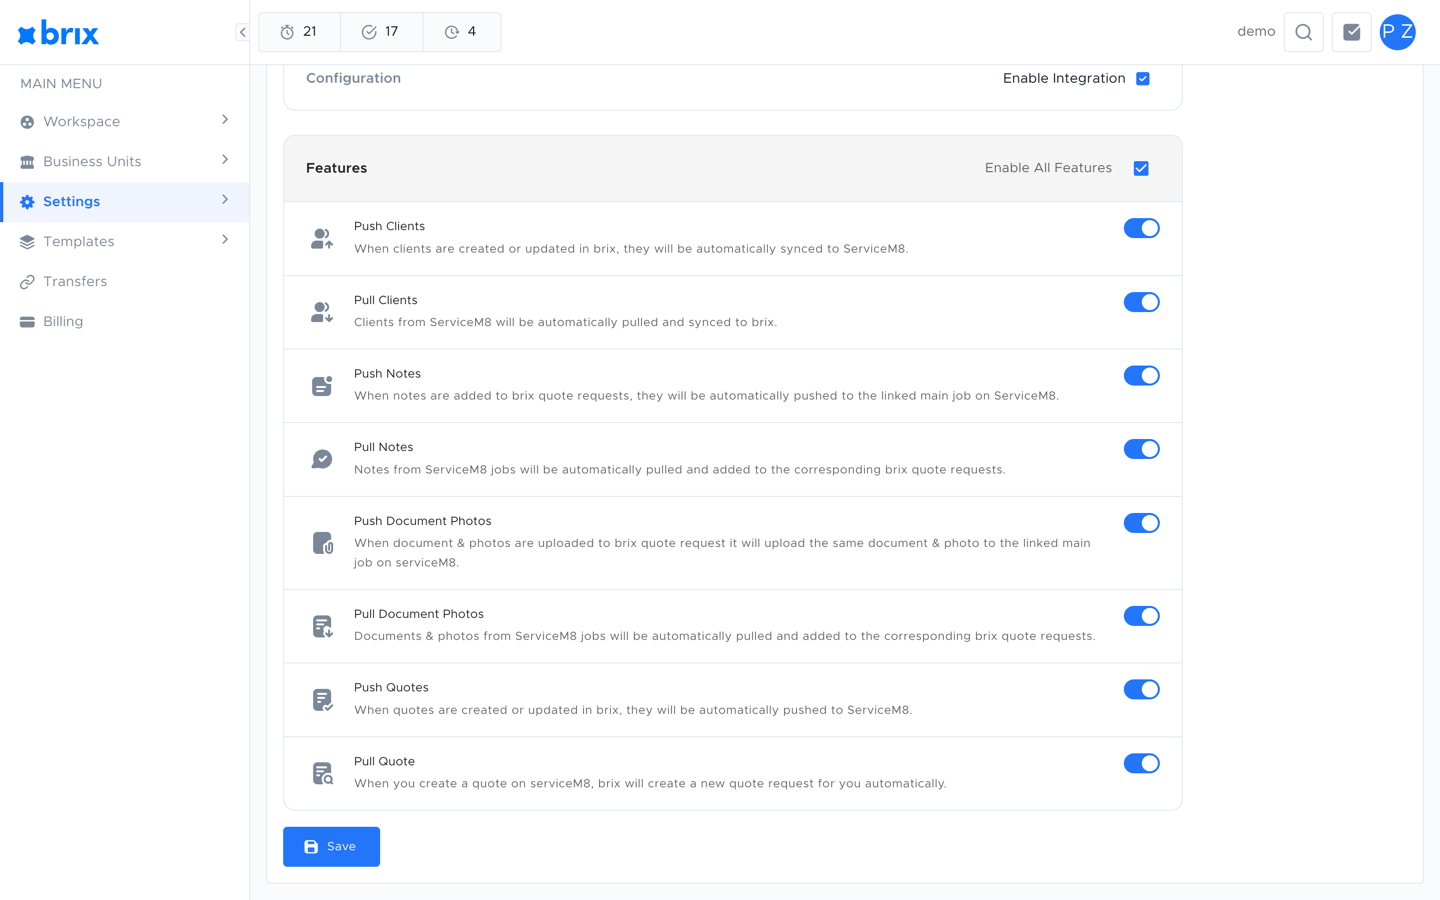
Section titled “Step 3 — Choose which features to enable”Tick Enable Integration, then turn on the features you want. Each feature is independent and can be turned on or off later.
| Feature | What it does |
|---|---|
| Push Clients | Sends Brix clients into ServiceM8 (creates or updates the matching company). |
| Pull Clients | Pulls ServiceM8 companies into Brix as clients. |
| Push Notes | Sends notes added in Brix into the linked ServiceM8 record. |
| Pull Notes | Brings notes added in ServiceM8 back into the Brix record. |
| Push Document Photos | Uploads photos attached to a Brix document into ServiceM8. |
| Pull Document Photos | Pulls photos attached in ServiceM8 into the matching Brix document. |
| Push Quotes | Sends Brix quotes into ServiceM8. |
| Pull Quote | When a quote is created in ServiceM8, Brix automatically creates a matching quote request. |
There is also an Enable All Features switch at the top of the section that turns every feature on or off in one click.
You must select at least one feature before you can connect.
Step 4 — Authorise with ServiceM8
Section titled “Step 4 — Authorise with ServiceM8”- Click Connect with ServiceM8.
- Brix redirects you to ServiceM8’s sign-in page in the same window.
- Sign in with the ServiceM8 account that should own the connection.
- Review the permissions ServiceM8 displays (these match the features chosen in Step 3) and click Allow.
- ServiceM8 redirects back to Brix automatically. You should see a green ServiceM8 connected successfully notification.
If the redirect fails or you click Deny in ServiceM8, Brix shows a red error notification with a short reason. You can simply click Connect with ServiceM8 again to retry.
Step 5 — Review granted scopes
Section titled “Step 5 — Review granted scopes”Once connected, the page now shows:
- A green Connected chip and the message “ServiceM8 is connected”.
- A Granted scopes list — small chips showing each permission ServiceM8 returned. If a feature is missing a required scope, that feature will not work; use Reconnect (top right) to grant the missing scopes.
Step 6 — Manage the connection
Section titled “Step 6 — Manage the connection”After the connection is established, the page exposes the controls you will use day to day.
Once the integration is live, you can link individual ServiceM8 jobs to quote requests directly from the request detail page. See Linking Jobs for the step-by-step walkthrough.
Reconnect
Section titled “Reconnect”Use Reconnect if you need to re-authorise (for example after revoking access in ServiceM8, after a connection expiry, or to grant additional scopes). Reconnect re-runs the sign-in flow with the features that are currently enabled.
Configuration
Section titled “Configuration”Below the connection details there is a second Configuration section with:
- An Enable Integration toggle. Turning this off keeps the credentials but stops Brix from syncing. You will be asked to confirm because Brix will no longer be able to talk to ServiceM8 until you turn it back on.
- The same Features switches as Step 3, so you can change which data flows without disconnecting.
- A Save button — only enabled once you change something.
Save your changes whenever you adjust features or the enabled state.
Step 7 — Map Brix users to ServiceM8 staff
Section titled “Step 7 — Map Brix users to ServiceM8 staff”Many ServiceM8 records (jobs, notes, time entries) are attributed to a staff member. To make sure activity from Brix is attributed to the right person, link each Brix user to a ServiceM8 staff member.
- On the ServiceM8 integration page, click Map users.
- The Map users dialog opens with a row per Brix user and a dropdown showing the ServiceM8 staff list.
- Brix suggests a match for each user based on email and name. Review each suggestion and adjust if needed.
- Use the search box at the top to filter the list when you have many users.
- Click Save to apply the mappings.
Repeat this any time you add new Brix users or new ServiceM8 staff.
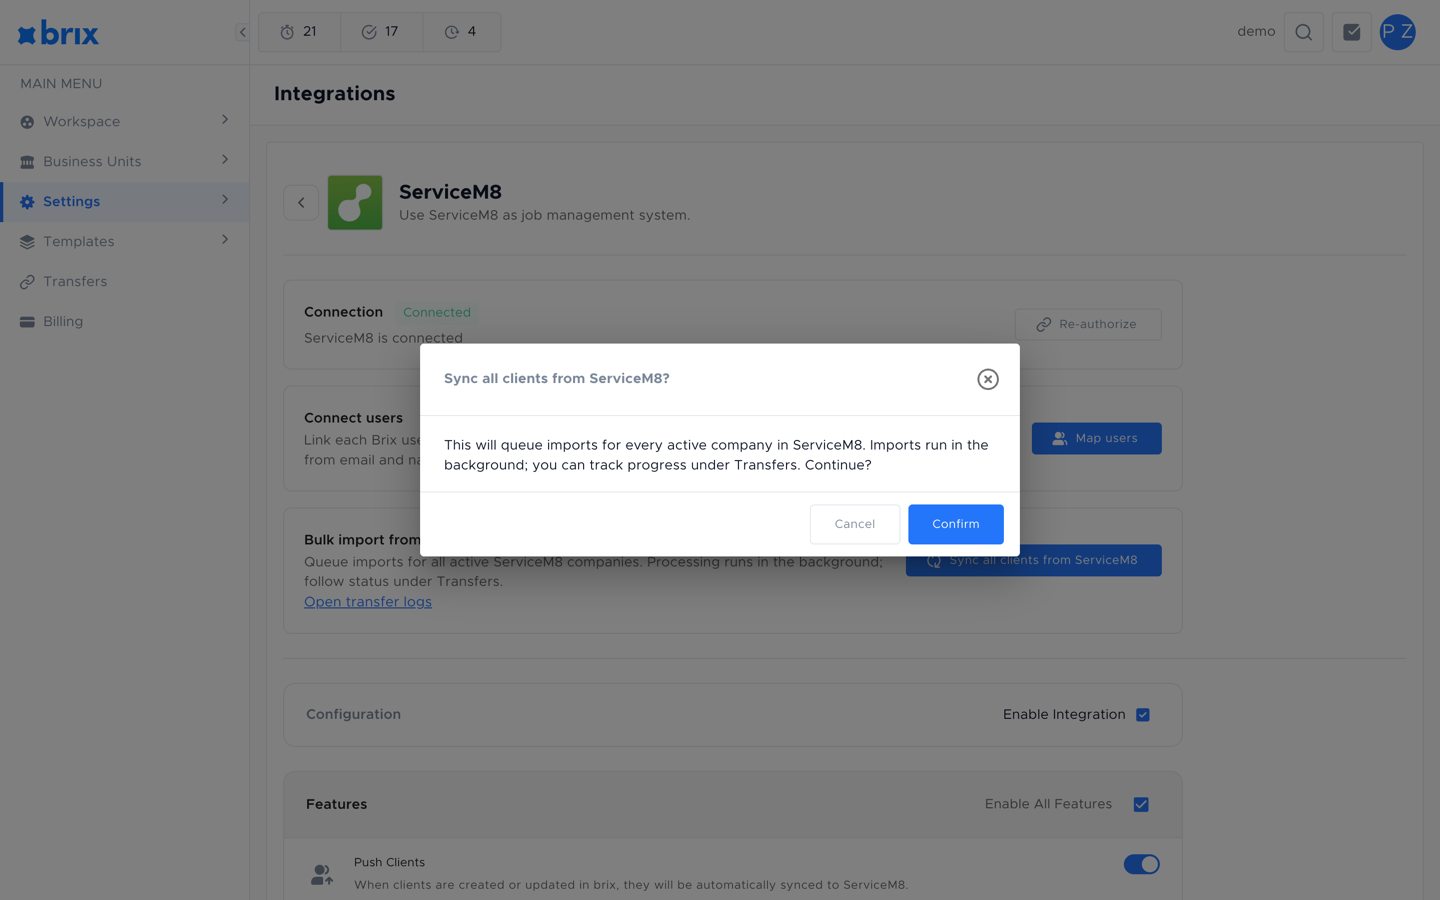
Step 8 — Run an initial client sync (optional)
Section titled “Step 8 — Run an initial client sync (optional)”If you turned on Pull Clients, you can backfill all existing ServiceM8 companies into Brix in one go.
- On the ServiceM8 integration page, scroll to Bulk import from ServiceM8.
- Click Sync all clients from ServiceM8.
- Confirm the action in the dialog. Brix queues an import for each active ServiceM8 company.
- A notification reports how many companies were queued and how many errors occurred (if any).
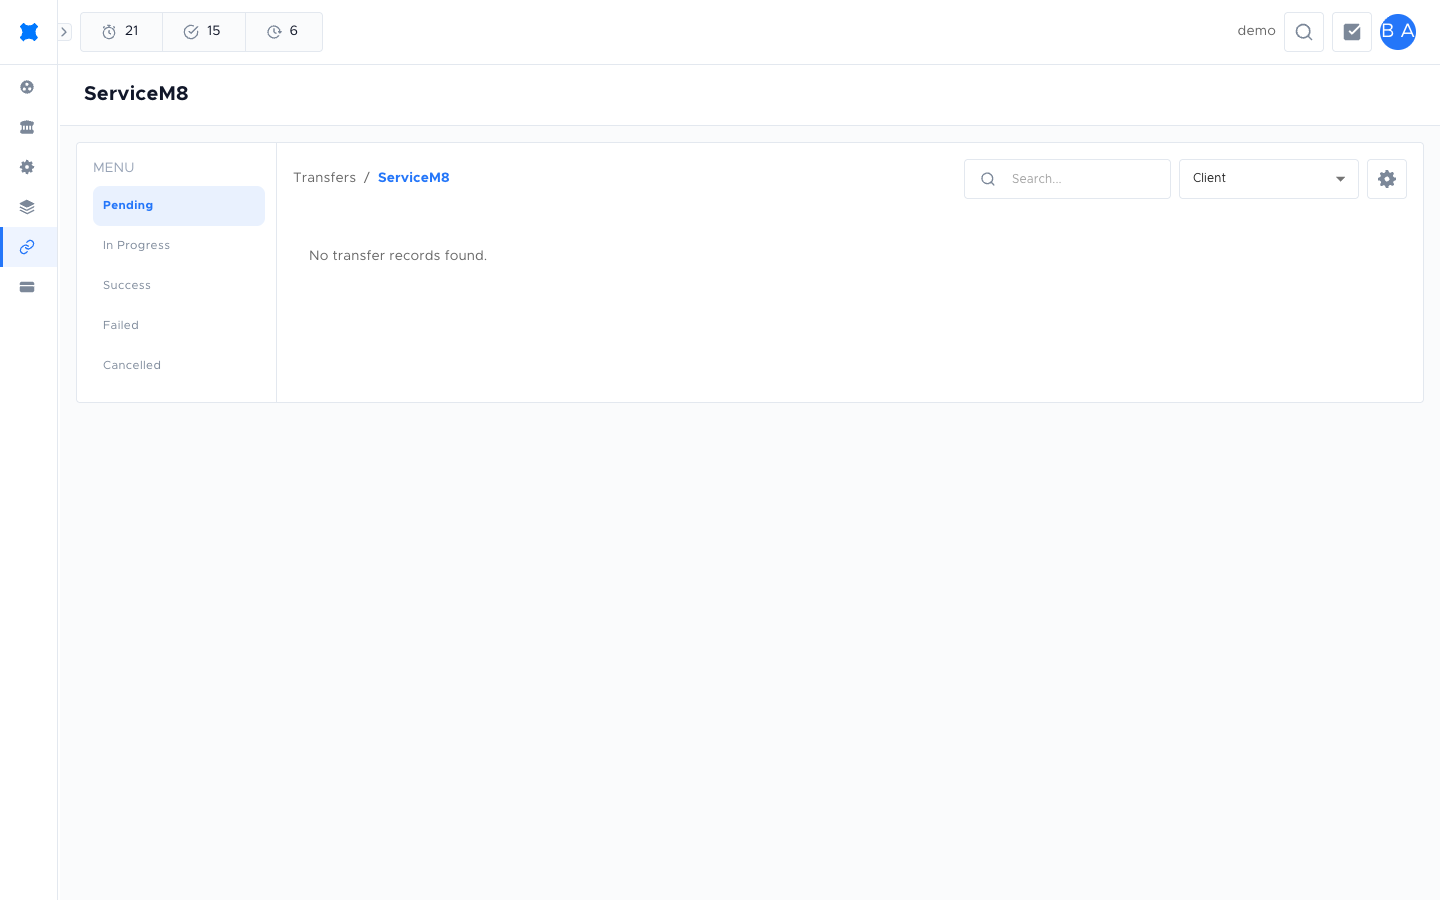
- Click Open transfer logs (or open Transfers from the sidebar) to watch the progress.
The Transfers page lists every queued import grouped by status — Pending, In Progress, Success, Failed, Cancelled — with a record-type filter (Client or Quote Request) and a search box. Click a row to open the transfer details and view logs. Failed transfers can be retried from there — see Managing transfers.
Step 9 — Verify the sync
Section titled “Step 9 — Verify the sync”After the initial sync (or after enabling a push/pull feature), verify the integration end-to-end:
- Clients — Open a recently transferred client in Brix, then open the matching record in ServiceM8 and confirm the contact details match.
- Notes — Add a note in Brix to a synced client. After a short delay, confirm the same note appears in ServiceM8 (and vice versa for Pull Notes).
- Quotes — Create or send a quote in Brix and confirm it appears in ServiceM8 if Push Quotes is on. If Pull Quote is on, create a quote in ServiceM8 and confirm a new quote request appears in Brix.
- Photos — Attach a photo to a document in Brix and confirm it appears in ServiceM8 (and vice versa).
If something does not appear, open the Transfers page, filter by Failed, and use the Transfer logs to see the error message.
Disabling or disconnecting
Section titled “Disabling or disconnecting”- Pause syncing — Turn off Enable Integration in the Configuration section and click Save. Brix keeps your settings but stops syncing.
- Change which data syncs — Turn individual feature switches on or off and click Save.
- Revoke access entirely — Sign in to ServiceM8 and remove the Brix app from your authorised connections. After that, use Reconnect in Brix to re-authorise from scratch when needed.
Troubleshooting
Section titled “Troubleshooting”| Symptom | What to check |
|---|---|
| Red Connection failed notification after sign-in | The ServiceM8 user did not approve all requested scopes, or closed the window before the redirect completed. Click Connect with ServiceM8 to retry. |
| A feature is enabled but nothing syncs | Check Granted scopes on the integration page. If a scope is missing, click Reconnect. |
| New ServiceM8 staff are not selectable in Map users | Reopen the Map users dialog so the staff list reloads, then re-save. |
| Transfers stuck in Pending | Open Transfers, select the rows and use Start Transfer. If they fail, open the row to read the Transfer logs. |
| A pushed client did not appear in ServiceM8 | Confirm Push Clients is on in Configuration, and check the transfer log for that client on the Transfers page. |
Frequently asked questions
Section titled “Frequently asked questions”Do I need to reconnect if I change the features in Configuration?
No. Changing individual feature switches in Configuration does not require reconnecting. Just update the switches and click Save.
What happens if I disconnect the integration?
Your settings are kept but syncing stops. Records already transferred remain in both systems. To reconnect, sign in with ServiceM8 again using Connect with ServiceM8.
Things to check
Section titled “Things to check”A feature is enabled but nothing syncs
Check Granted scopes on the integration page. If a scope is missing, click Reconnect to re-authorise.
Transfers stuck in Pending
Open Transfers, select the rows and use Start Transfer. If they fail, open the row to read the transfer logs.
Related guides
Section titled “Related guides”- Integrations Overview — list of available integrations and how they relate to Transfers.
- AroFlo Integration — connect Brix to AroFlo using your AroFlo credentials.
- Transfers Overview — what transfers are and where to find them.
- Managing Transfers — filter, retry, cancel, and inspect transfer logs.