
Digital Forms
What are digital forms?
Section titled “What are digital forms?”Digital forms are configurable checklists your team fills in on site, for example a “Gas Heater Health Report” that records the condition of each item using a condition rating (Good / Caution / Action). A form can be any kind of form: a service inspection, a safety check, or a sign-off sheet a customer signs on site.
You design a form once in the Form Builder, publish it, then fill it in directly on a quote request. Each form is built from blocks you can add, reorder, and remove freely: question sections, a client-equipment section, sign-off signatures, and submit notifications.
Both form families live under Manage → Settings and are filled in on a quote request.
Where to find them
Section titled “Where to find them”| What you want to do | Where to go |
|---|---|
| Create and manage digital forms | Manage → Settings → Forms |
| Fill in or view a submitted form on a job | Open any quote request and scroll to the Forms section |
Form Register
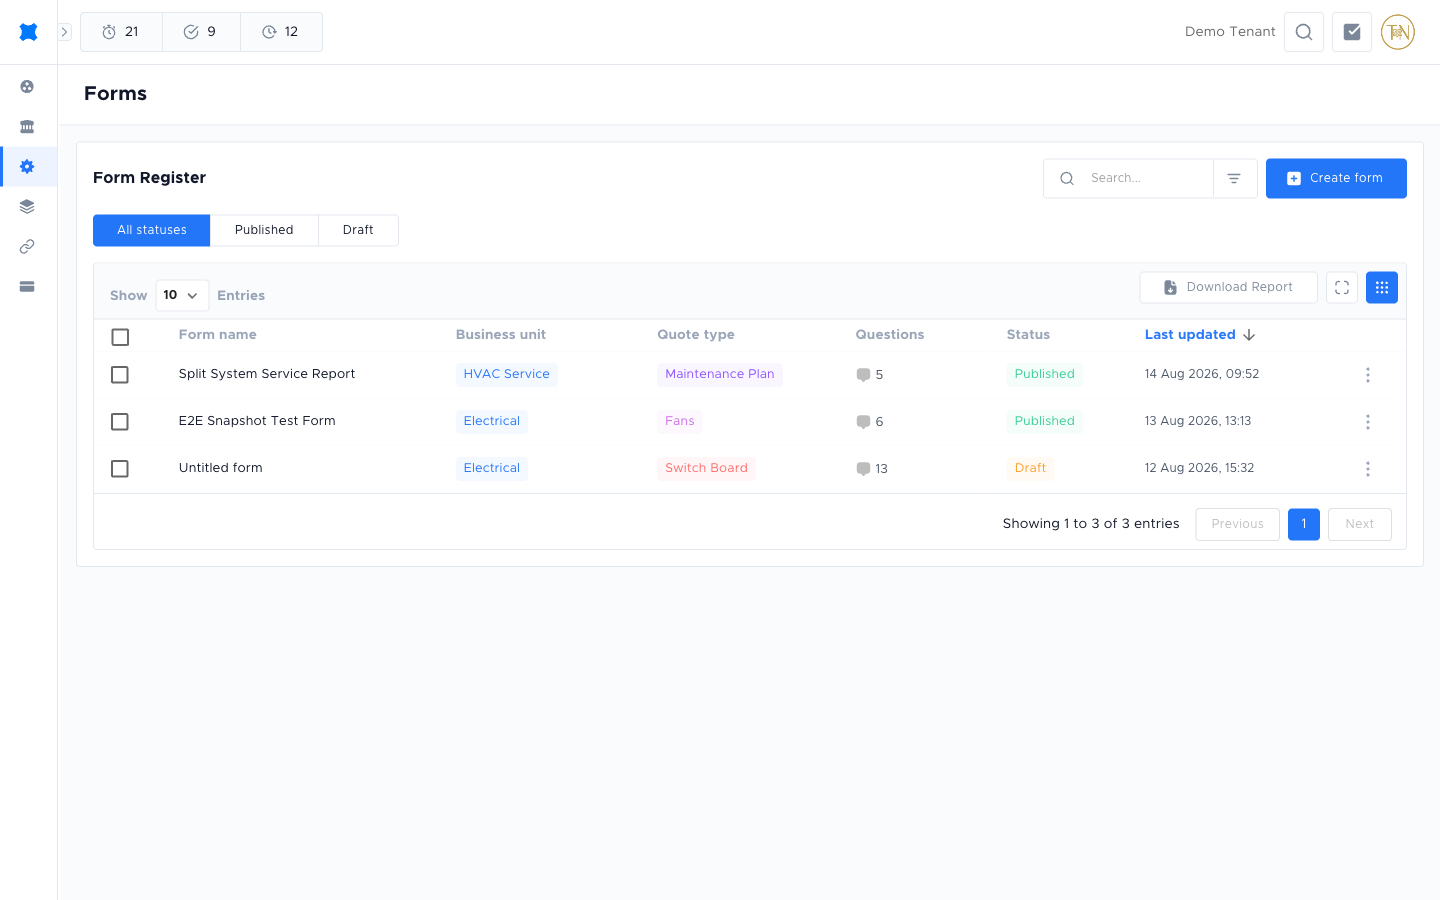
Section titled “Form Register”The Form Register lists every form. Each row shows the form’s name, opportunity types, question count, status (Draft or Published), and when it was last updated.
Filter and search
Section titled “Filter and search”- Use the search box to find a form by name.
- Use the filter button beside the search box to narrow the list.
- Click the All / Published / Draft / Archived tabs to filter by status.
Create a form
Section titled “Create a form”- Go to Manage → Settings → Forms.
- Click Create form in the top-right corner.
- Name the form, then click Confirm. You set its opportunity types later, in the builder.
- The new draft opens straight in the Form Builder, empty, so you add only the sections and blocks this form needs.
Row actions
Section titled “Row actions”Click the action menu (three dots) on any row to:
- Edit: open the form in the Form Builder.
- Duplicate: create a copy with “(Copy)” added to the name. The copy starts in Draft and keeps the same sections, questions, sign-off slots, and block positions.
- Delete: remove the form.
Form Builder
Section titled “Form Builder”The Form Builder has three panes: the Outline rail on the left (jump to any section, or switch to Add field to add questions and blocks), the form canvas in the middle, and the inspector on the right showing whatever you have selected. Every section and block on the canvas has a drag handle: grab it to reorder. On a narrow screen the rail and inspector move into drawers.
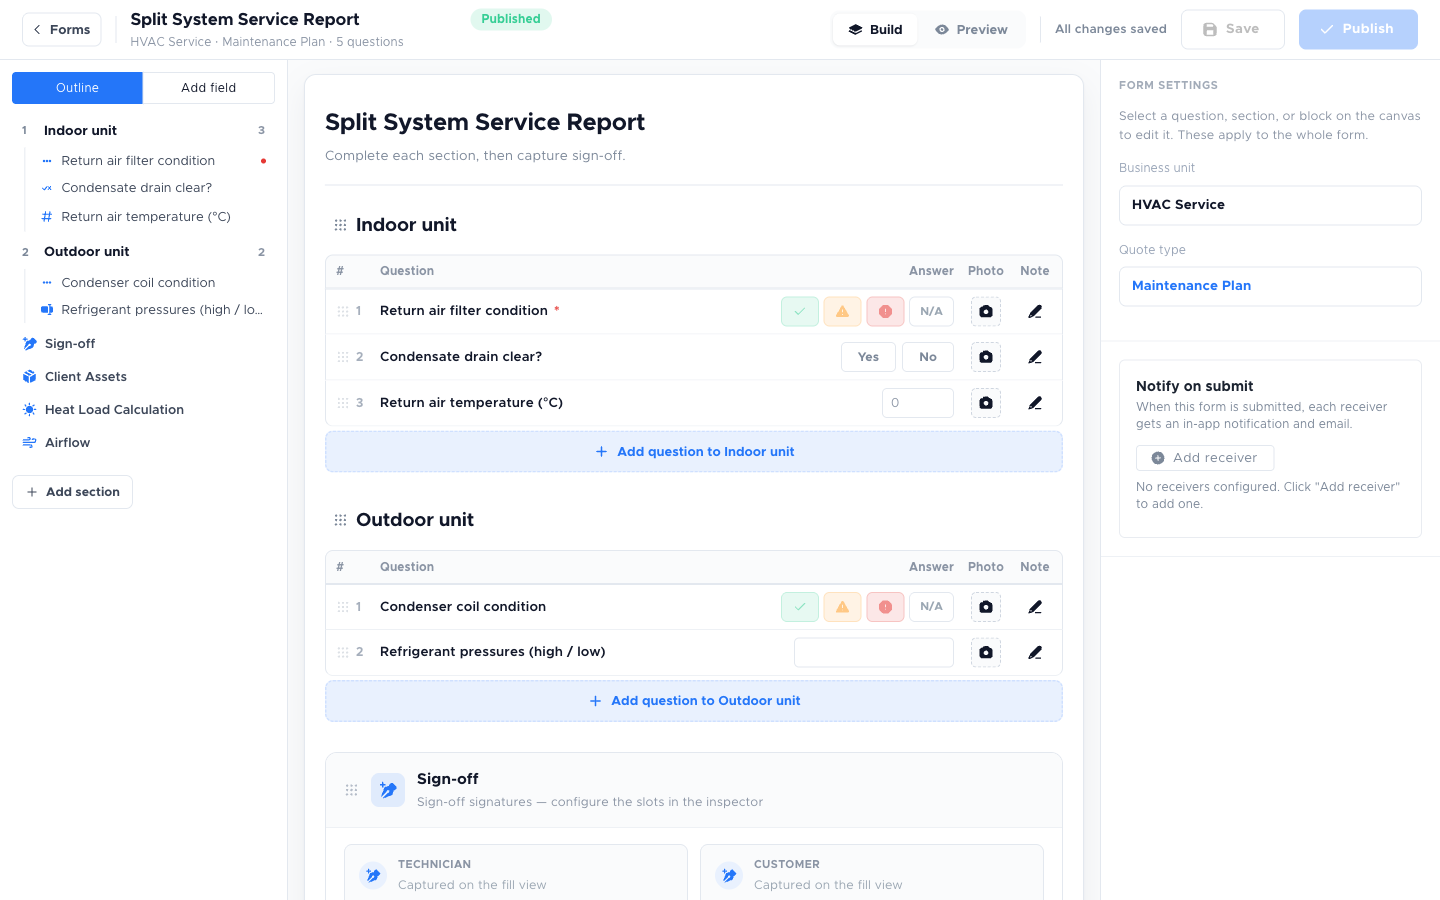
The top bar shows the form name, its Draft or Published chip, whether there is anything unsaved, and these controls:
| Button | What it does |
|---|---|
| Build / Preview | Switches between editing the form and seeing it exactly as the technician will fill it in |
| Save | Stores your edits as an unpublished draft. The bar then reads “Saved · not published yet” |
| Discard | Throws the unsaved edits away and goes back to the published version |
| Publish | Applies the saved draft and makes it live for new fills |
The builder saves when you click Save, not on every keystroke. Leaving the page or crossing to Preview asks first if anything is unsaved.
The blocks
Section titled “The blocks”Form configuration (always present, draggable) Sets the Opportunity types the form applies to. A form can carry several, or none at all. Leave it empty and the form is available for every opportunity type.
Question sections (add as many as you need) Each section is a table of items, for example “Indoor unit” or “Safety & Compliance”. Every row shows its number, the question, and the answer control the technician will use, plus a camera and a note pencil where you have allowed them. Use the Add question button under a section to add a row, and Add section for another section. A section with no questions cannot be published.
Client Assets (add as many as you need, anywhere) A section where the technician records the equipment serviced. The equipment list is built at fill-in time by searching the equipment catalogue. See Filling in a form below.
Heat Load Calculation (add as many as you need, anywhere) A section where the technician adds each room and the form works out its heating or cooling load. For every room they enter the floor area, ceiling height, sun exposure, and insulation level, and the form calculates the load (in kW) per room and a running total. Open the block’s configuration to adjust the multiplier behind each factor, or add your own custom factors so the calculation matches how your business sizes equipment.
Airflow (add as many as you need, anywhere) A section where the technician records an airflow reading (L/s) and a temperature (°C) for each room or location.
Sign-off (add as many as you need, anywhere) Holds the signature slots that appear at the bottom of the form. Each slot has a label (for example “Technician” or “Customer”) and a Required toggle. Use Add signature to add a slot and the trash icon to remove one.
Notify on submit (always present, draggable) Lists the people who receive an in-app notification and an email each time the form is submitted. Use Add receiver to add someone.
Editing a question
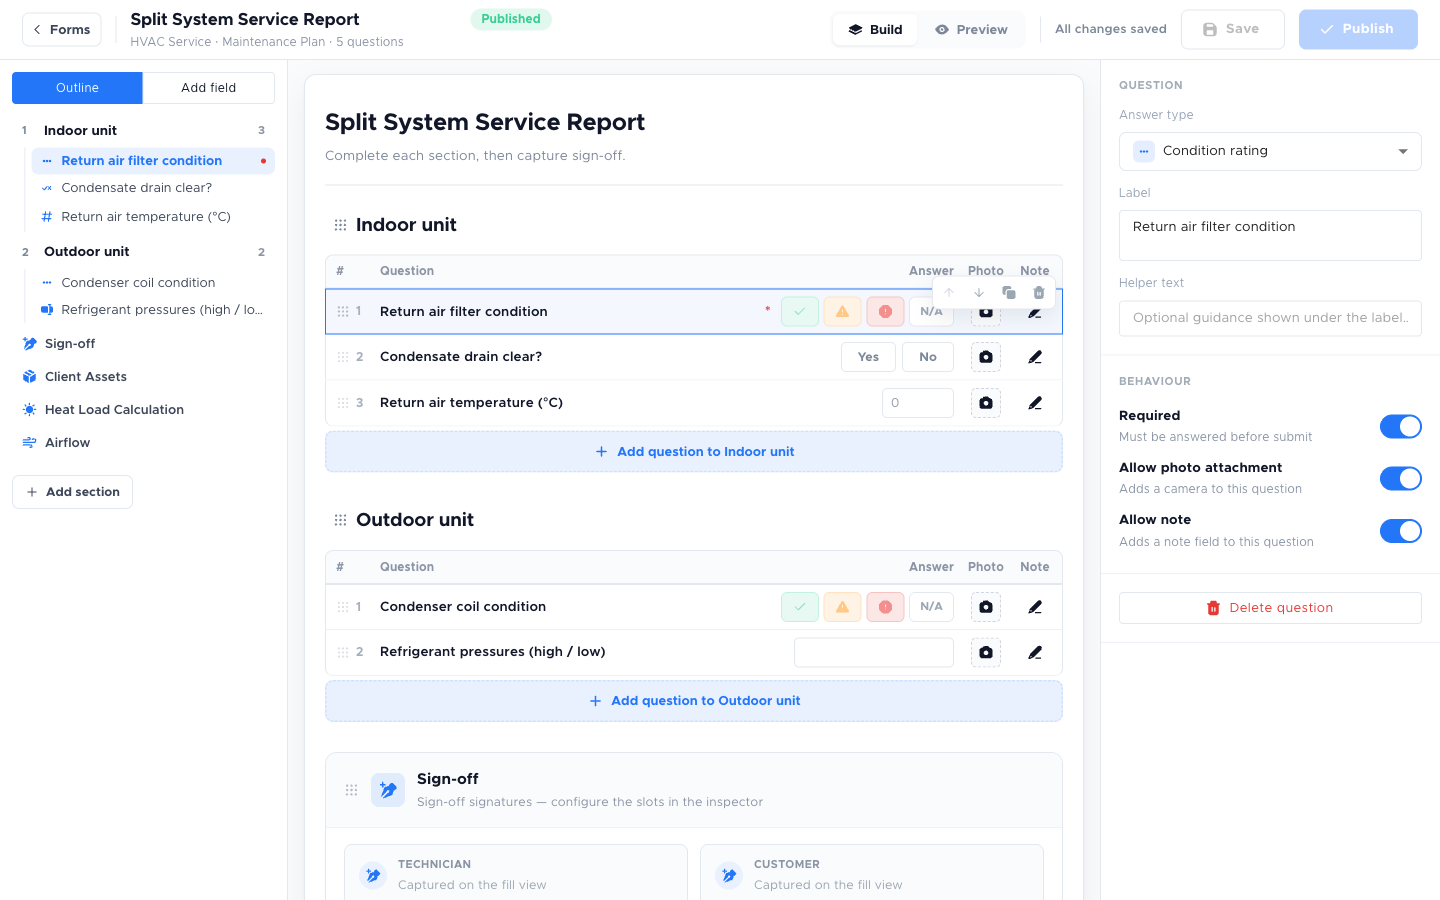
Section titled “Editing a question”Click any question row on the canvas. Its settings open in the inspector on the right and apply as you type. There is no dialog to confirm.
| Setting | What it does |
|---|---|
| Answer type | How the technician answers the row: Condition rating (Good / Caution / Action), Yes / No, Number, Text / note, Single choice, Multi-select tags, or Grouped row for several inputs on one line. Each row can use a different type, so one form can mix them. |
| Label | The prompt shown to the technician. |
| Helper text | Optional guidance shown under the label. |
| Required | When on, the technician must answer this row before submitting. |
| Allow photo attachment | Adds a camera to the row. |
| Allow note | Adds a note field to the row. |
Turning Allow photo attachment or Allow note off hides that control for the technician, so a row can be answer-only.
Build a form
Section titled “Build a form”- Open a draft form from the register (or click Create form).
- In Form configuration, set the Opportunity types the form applies to. This is optional. Skip it if the form should be available for every opportunity type.
- Click Add section, name it, then add questions and set each one’s answer type in the inspector.
- Switch the left rail to Add field to drop in a Client Assets, Heat Load, Airflow or Sign-off block.
- Drag any section or block by its handle to reorder the form.
- Click Save, use Preview to check the result, then Publish when you are happy.
Filling in a form on a quote request
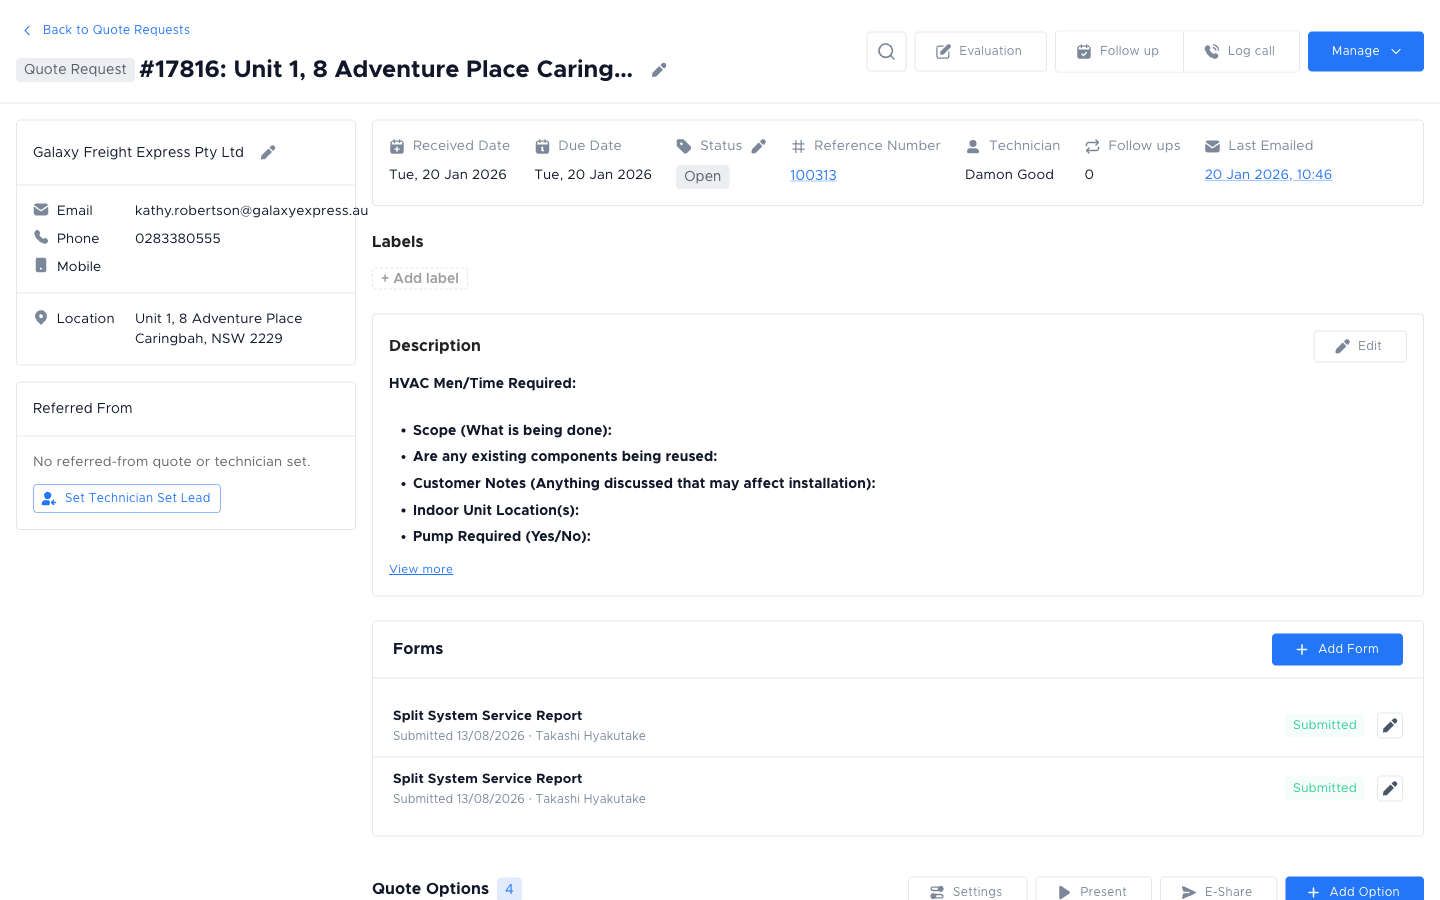
Section titled “Filling in a form on a quote request”Open a quote request and the Forms section lists every form already submitted against it, of either type, with the form name, status, submitted date, and who submitted it.
Add and fill a form
Section titled “Add and fill a form”- On a quote request, scroll to the Forms section and click Add Form.
- If the quote request has an opportunity type, the picker uses it and shows it as fixed. Otherwise pick one first. Then choose a published form from the list. Every form carrying that opportunity type, plus every form with none, appears.
- Name this fill so you can tell it apart on the quote request (for example “Level 1 office split”), then click Add form. The fill screen opens.
- Add the equipment serviced in Client Assets, if the form has that block.
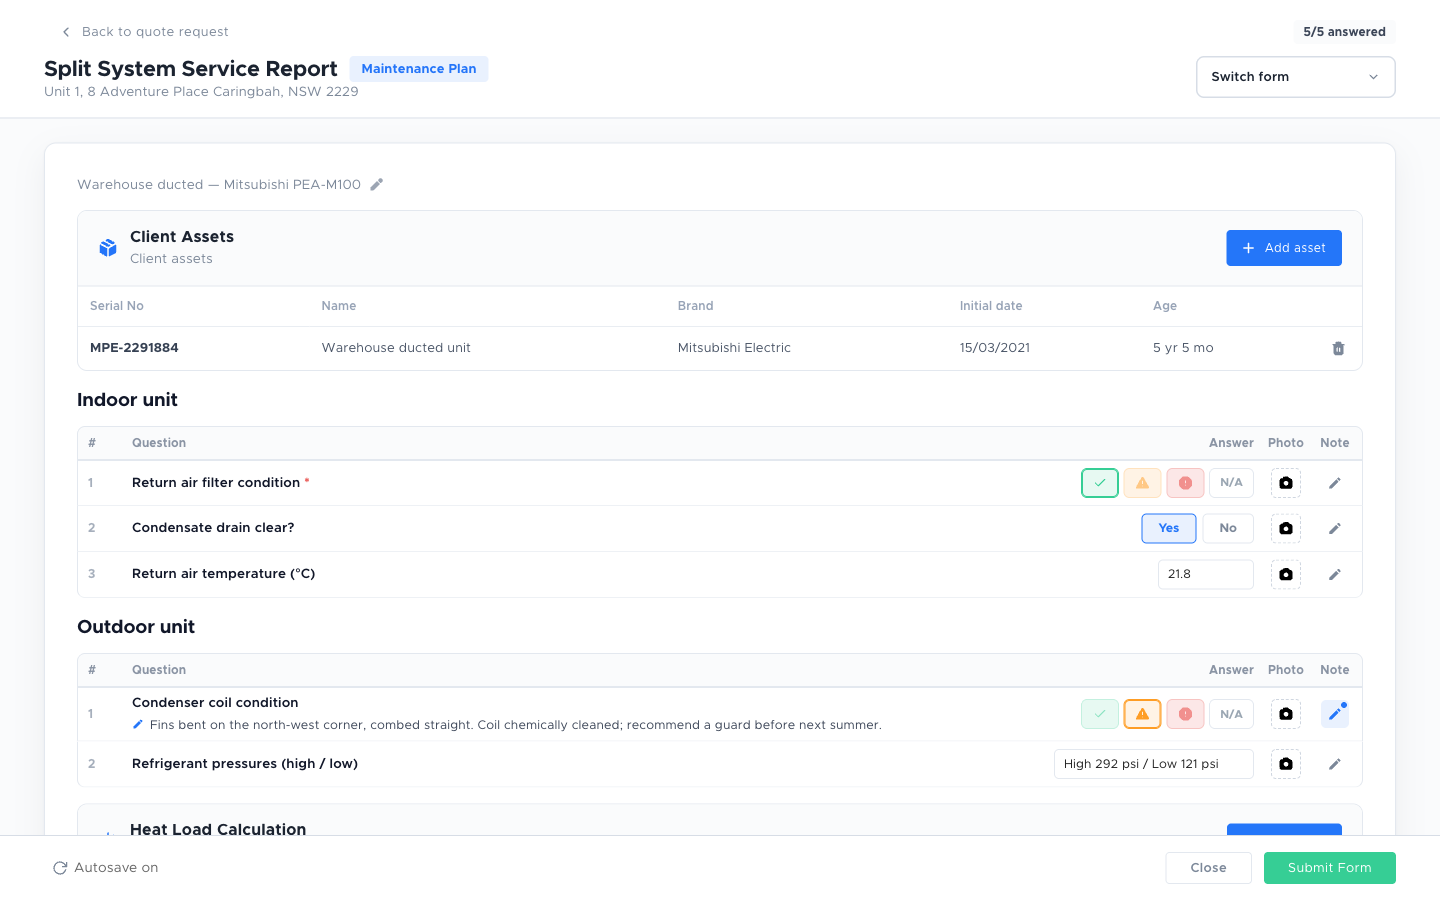
- Work through each question section:
- Condition rating: tap Good, Caution, Action, or N/A.
- Yes / No: tap Yes or No.
- Number and Text / note: type into the inline box.
- Answer choices: tick the options that apply.
- On any row, tap the pencil in the Notes column to add a note or attach photos.
- In a Client Assets section, record the equipment serviced (see below). In a Heat Load Calculation section add each room; in an Airflow section record the reading and temperature per room.
- Sign each Sign-off signature at the bottom.
- Add any overall observations in Additional notes.
- Use Save at any point to keep the form as a draft you can return to and finish later. When the form is complete, click Publish to finalise it and produce the PDF report.
Recording client equipment
Section titled “Recording client equipment”In a Client Assets section, search the equipment catalogue to add the equipment you serviced. Selecting an item fills in its details (such as part number, supplier, category, and sub-category) automatically, leaving you to type the Serial No by hand. You can also press Enter or choose add manually to record equipment that is not in the catalogue, and add your own custom fields.
Every piece of equipment needs a Serial No before the form can be published. It is the field that identifies the asset. After you publish, the equipment is saved to the client’s record. Open the client and go to the Client Assets tab to see every item recorded against them, with its name, brand, model, serial number, and age.
Viewing a submitted form
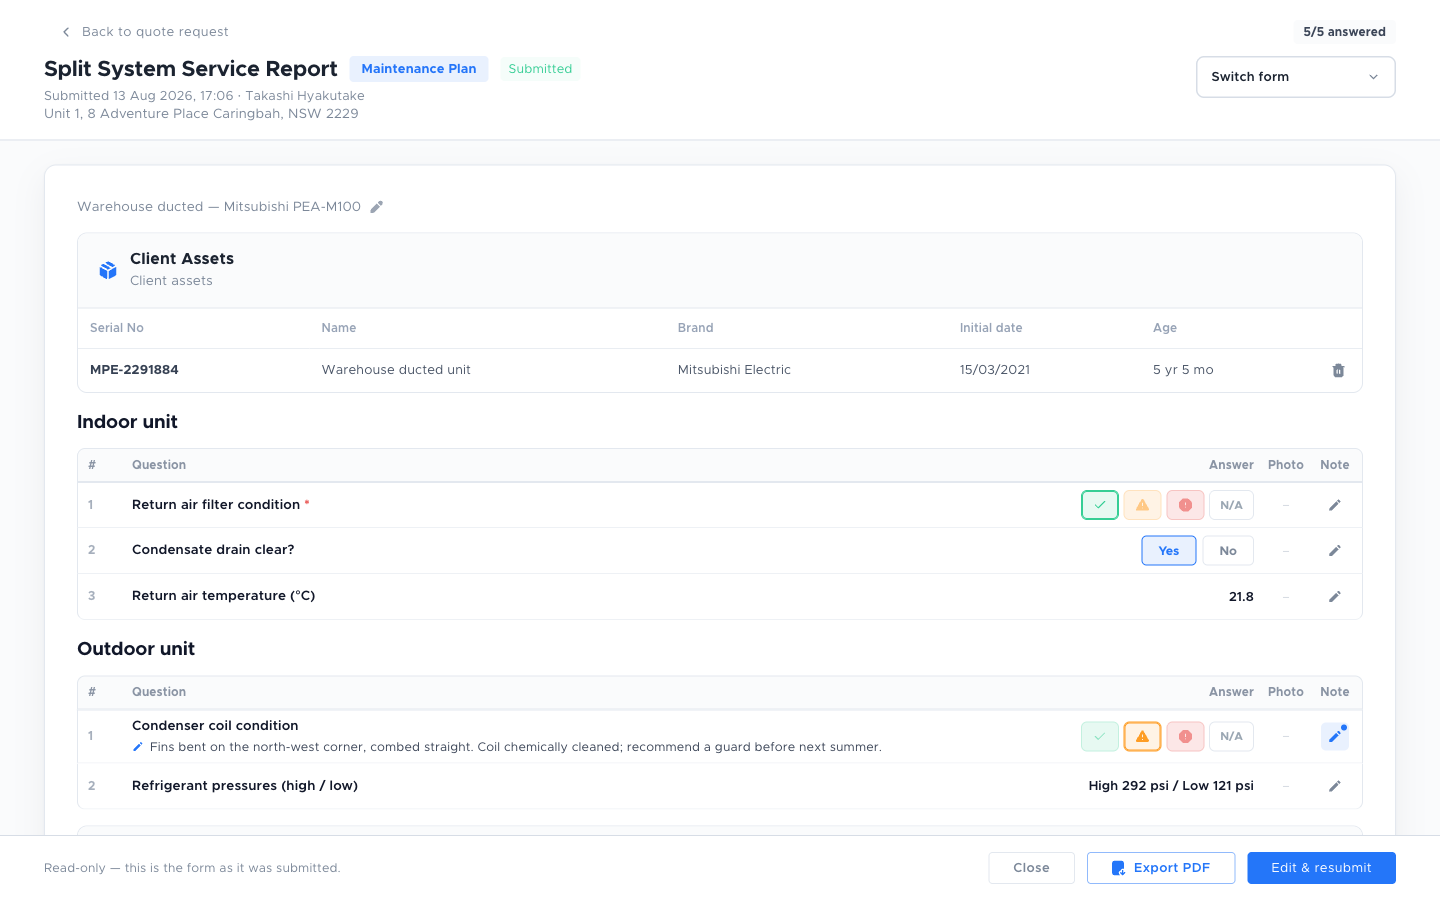
Section titled “Viewing a submitted form”Click any submitted form row to reopen it. It is the same page the technician filled in, locked, so a record reads exactly as it was submitted:
- The form name, its status, when it was submitted and by whom.
- The equipment captured in Client Assets, and any Heat load or Airflow readings.
- Each section with the answers as they were recorded (condition ratings, Yes / No, typed readings and notes) rather than in empty inputs. A question nobody answered reads
—. - Captured signatures, each with the date it was signed.
- Additional notes, if any were entered.
The footer offers Close, Export PDF, and Edit & resubmit, which unlocks the form in place.
PDF reports and versions
Section titled “PDF reports and versions”The form itself stays as one record, but every time you Publish it a new PDF report is generated and attached to the quote request’s Photos & Documents. The reports are numbered (v1, v2, …) so you keep a full history of how the form looked at each publish. Updating a field and publishing again adds the next version rather than replacing the last.
Each PDF includes the whole form: the answers, the captured signatures, and every photo uploaded against the rows (each photo on its own page at the end). You can also click Export PDF in the submission header to download the report on demand.
Form statuses
Section titled “Form statuses”| Status | Meaning |
|---|---|
| Draft | The form is being designed. It cannot be added to a quote request yet. |
| Published | The form is ready and appears in the form picker on quote requests. |
Submission records also have statuses:
| Status | Meaning |
|---|---|
| Draft | Saved but not yet published, still being filled in. |
| Submitted | Published at least once (a PDF report was produced). It can still be reopened, updated, and published again. |
Common issues
Section titled “Common issues”I cannot see any forms in the “Add form” picker on a quote request
The picker only shows Published forms for the quote request’s opportunity type, plus any form with no opportunity types set (those always show). Check that:
- The form is Published. Go to Manage → Settings → Forms and confirm the status chip.
- The form carries the quote request’s opportunity type, or has none set. Open the form and check the Form configuration block.
The “Add form” button is not visible on a quote request
Your permission group may not include the Submit Digital Forms permission. Ask your workspace owner to check your access under Manage → Settings → Permission Groups.
I need to correct an answer after submitting
You do not need to start over. Reopen the same form record, change the answer, and click Publish again. It stays the same record and a new PDF report is produced, with the previous reports kept for history.
I cannot edit a Published form
Published forms are locked for editing. Click Save as draft in the Form Builder to return the form to Draft, make your changes, then Publish again. Returning a form to Draft does not affect records already submitted.
The equipment I serviced is not in the catalogue
In the Client Assets search box, press Enter or click add manually to record the equipment by hand. You can type its details and add your own custom fields. It does not need to exist in the catalogue.